- Welcome to ZawZaw.blog/
- BLOG/
- Containers from Scratch: Deep Dive into Single-Host Container Networking/
Containers from Scratch: Deep Dive into Single-Host Container Networking

Table of Contents
This article focused on a deep dive into Container networking; how to run Containers and configure Container Networking from scratch using the tools, such as Linux Namespaces, chroot, unshare and ip. This article also provides a hands-on practical guide on how to run and configure from scratch using these tools. You’ll mainly learn how Container Networking works at the underlying layer (or low level), and then you’ll clearly understand how Docker Container Networking works.
Summary: Objectives #
What you’ll learn in this article:
Basic Concepts of Containerization.
Linux Namespaces, the foundation of modern Container technologies.
How Linux Namespaces work and How Containers isolate from the Host OS.
How Virtual Ethernet and Bridge networking work.
How Containers and Container Networking work at the underlying layer, also known as low level.
Prerequisities #
Before we begin, make sure you are familiar with the following tools:
Linux Host (e.g., Ubuntu, Fedora, etc..)
chroot ─ a user-space tool to interact with the chroot(2) system call, to change the root filesystem of the calling process.
unshare ─ a user-space tool to interact with Linux kernel namespaces by invoking the unshare(2) system call, to create a new process in a new namespace that isolates the process ID, mount, IPC, network, and so on.
ip ─ a command-line tool to configure network interfaces, routing, and tunnels.
Linux namespaces ─ a feature of the Linux kernel that isolates and virtualizes system resources for a collection of processes.
NOTE: If you have installed any Linux distribution, these tools are built-in tools and features.
Introduction to Containers #

Nowadays, containers are a popular topic, and most companies are using containers to build, ship and run application workloads in both development and production environments.
Basically, containers are a way to package and deploy applications in an isolated and portal environment and they provide a standardized way to bundle an application’s code, dependencies and configuration into a single unit that can be easily deployed on the server.
Containers use OS-level virtualization to create an isolated environment for running applications. OS-level virtualization is a technology that allows multiple isolated Operating Systems to run on the same hardware, also known as containerization. Containers share the Host OS’s kernel and hardware resources, such as CPU and memory that make resource efficiency.
Benefits of using Containers are:
Portability: Containers can be moved easily between different environments, such as development, QA, staging and production.
Consistency: Containers ensure that the application and its dependencies are packaged into a single unit that can be deployed easily.
Scalability: Containers can be scaled up or down easily on demand.
Efficiency: Containers are lightweight and share the Host OS’s kernel and hardware resources that make more efficient to run applications.
Setup Project and Root Filesystem #
Firstly, we will build and run Containers from scratch using the chroot and unshare command-line tools to understand how Containers work.
Project Structure looks like:
${HOME}/containers
        ├── alpine-linux
        │   ├── bin
        │   ├── dev
        │   ├── etc
        │   ├── home
        │   ├── lib
        │   ├── media
        │   ├── mnt
        │   ├── opt
        │   ├── proc
        │   ├── root
        │   ├── run
        │   ├── sbin
        │   ├── srv
        │   ├── sys
        │   ├── tmp
        │   ├── usr
        │   └── var
        └── tiny-linux
            ├── bin
            ├── dev
            ├── proc
            ├── sbin
            ├── sys
            └── usr
Create a project directory named, containers and then, we will put the Linux root filesystems (Alpine Linux, Tiny Linux) into it.
$ mkdir -p containers/alpine-linux
In this article, we will use the Alpine Linux Mini root filesystem. Go to the Alpine Linux official website https://alpinelinux.org/downloads and download the Alpine Linux Mini root filesystem.
Alpine Linux has supported the Alpine Mini root filesystem that is for containers and minimal chroots. That supports multiple system architectures, such as aarch64, armv7. riscv64, x86, x86_64 and so on.

(Or)
Download with the curl command line tool. For example, x86_64 architecture.
$ curl -LO https://dl-cdn.alpinelinux.org/alpine/v3.21/releases/x86_64/alpine-minirootfs-3.21.3-x86_64.tar.gz
Put the downloaded Alpine Linux Mini rootfs file under the containers/alpine-linux directory and then, extract the mini rootfs tar file.
$ tar -xzvf alpine-minirootfs-3.21.3-x86_64.tar.gz
Then, clean up the alpine-minirootfs-3.21.3-x86_64.tar.gz tar file.
$ rm alpine-minirootfs-3.20.2-x86_64.tar.gz
Running Containers from Scratch #
Chroot: Basic Concept of Containers #
/ (Host Root Filesystem)
├── bin
├── dev
├── etc
├── home
│   └── zawzaw/
│        └── containers/
│            ├── alpine-linux/
│            │    ├── bin
│            │    ├── dev
│            │    ├── etc
│            │    ├── home
│            │    ├── lib
│            │    ├── proc
│            │    ├── sbin
│            │    └── var
│            └── tiny-linux/
│                 ├── bin
│                 ├── dev
│                 ├── init.sh
│                 ├── linuxrc -> bin/busybox
│                 ├── proc
│                 ├── sbin
│                 ├── sys
│                 ├── sbin
│                 └── usr
├── proc
├── sbin
├── sys
├── usr
└── var
chroot (Change Root) is a Basic Concept of Containers. chroot is an operation that changes the apparent root directory for the current running process and its children on Unix and Unix-like operating systems. Historically, the chroot system call was introduced in Unix Seventh Edition (Version 7) in 1979.
The chroot user-space program (or cleint command-line tool) functionality relies on kernel support because it calls the system call chroot(2) handled by the kernel. This means that while you can execute chroot in user space, its effects depend on kernel-level enforcement.
chrootis a user-space program (or) client command-line tool.- It calls the chroot(2) system call, which is handled by the kernel.
- It is commonly used for sandboxing processes (or) creating minimal environments for recovery and testing.
- A process inside chroot still runs with the same privileges (it does not enhance security like containers do).
Using the chroot User-space Tool #
On Linux, we can use the chroot client command-line tool, to interact with the chroot(2) system call (a kernel API function call) to change the root directory for the current running process.
Go to the already created project directory ${HOME}/containers/alpine-linux and run the chroot command.
$ cd $HOME/containers/alpine-linux
$ sudo chroot . /bin/sh
/ # ls -l
total 0
drwxr-xr-x    1 1000     1000           858 Jul 22 14:34 bin
drwxr-xr-x    1 1000     1000             0 Jul 22 14:34 dev
drwxr-xr-x    1 1000     1000           540 Jul 22 14:34 etc
drwxr-xr-x    1 1000     1000             0 Jul 22 14:34 home
drwxr-xr-x    1 1000     1000           272 Jul 22 14:34 lib
drwxr-xr-x    1 1000     1000            28 Jul 22 14:34 media
drwxr-xr-x    1 1000     1000             0 Jul 22 14:34 mnt
drwxr-xr-x    1 1000     1000             0 Jul 22 14:34 opt
dr-xr-xr-x    1 1000     1000             0 Jul 22 14:34 proc
drwx------    1 1000     1000            24 Jul 30 04:26 root
drwxr-xr-x    1 1000     1000             0 Jul 22 14:34 run
drwxr-xr-x    1 1000     1000           790 Jul 22 14:34 sbin
drwxr-xr-x    1 1000     1000             0 Jul 22 14:34 srv
drwxr-xr-x    1 1000     1000             0 Jul 22 14:34 sys
drwxr-xr-x    1 1000     1000             0 Jul 22 14:34 tmp
drwxr-xr-x    1 1000     1000            40 Jul 22 14:34 usr
drwxr-xr-x    1 1000     1000            86 Jul 22 14:34 var
/ # cat /etc/os-release
NAME="Alpine Linux"
ID=alpine
VERSION_ID=3.21.3
PRETTY_NAME="Alpine Linux v3.21"
HOME_URL="https://alpinelinux.org/"
BUG_REPORT_URL="https://gitlab.alpinelinux.org/alpine/aports/-/issues"
Then, you need to mount the proc virtual filesystem inside the chroot isolated environment.
$ mount -t proc proc /proc
This mount command mounts the /proc Virtual Filesystem (VFS) to the /proc directory inside the chroot (or) container environment.
mount: This command to attach a filesystem to the directory tree.-t proc: Specifies the filesystem type as the proc virtual filesystem.proc: The source since proc is virtual, no physical device is used./proc: The mount point where the filesystem will be attached in the chroot isolated root filesystem.
Why do we need to mount the /proc filesystem?
Mounting the /proc filesystem inside the chroot environment is necessary because the /proc virtual filesystem is a critical component (or) feature that is information about the system and process provided by the Linux kernel to the user-space apps and tools. Without it, many user-space apps and tools (e.g; ps, top) that rely on /proc will not work properly.
For example, the ps tool will not work properly.
$ ps aux
Output:
# Error: Could not read /proc/stat
Read more details about the /proc virtual filesystem in the next section.
The /proc Virtual Filesystem #
The proc filesystem (often referred to as /proc) is a Virtual Filesystem (VFS) also known as a Pseudo (or) Special Filesystem on Linux that provides a way to expose system and process information to users and user-space applications in a structured, file-like format by the Linux kernel.
That does not rely on physical storage devices, such as HDDs and SSDs. The files and directories in /proc are not stored on disk and exist only in memory, and are generated on-the-fly (or) exposed dynamically by the Linux kernel when the system is booted.
Key Features of the /proc Filesystem:
(1) Virtual and Dynamic:
- The files and directories in
/procare generated dynamically by the Linux kernel. - The files and directories in
/procdon’t exist on disk; they are created in memory when read.
- The files and directories in
(2) System and Process Information:
- /proc provides the detailed information about:
- Running processes (e.g;
/proc/[PID]for each process). - System hardware (e.g; CPU:
/proc/cpuinfo, Memory:cat /proc/meminfo) - Kernel configuration and runtime parameters.
- Running processes (e.g;
- /proc provides the detailed information about:
(3) Readable and Writable:
- Most files in
/procare readable (e.g; you can cat/proc/cpuinfo). - Some files are writable, allowing you to modify kernel parameters at runtime (e.g;
/proc/sys).
- Most files in
After you run the mount -t proc proc /proc command inside the container, you can test the following commands.
cat /etc/os-release: To check the running container’s Linux distribution.cat /proc/version: To check the Linux kernel version that is shared from the Host OS.cat /proc/cpuinfo: To check the CPU information that is shared from the Host OS.cat /proc/meminfo: To check the Memory information that is shared from the Host OS.ps aux: To check all processes that are running inside the container.ip addr show: To see all IP addresses inside the currently running container.
For example,
/ # cat /etc/os-release
NAME="Alpine Linux"
ID=alpine
VERSION_ID=3.21.3
PRETTY_NAME="Alpine Linux v3.21"
HOME_URL="https://alpinelinux.org/"
BUG_REPORT_URL="https://gitlab.alpinelinux.org/alpine/aports/-/issues"
/ # cat /proc/version
Linux version 6.13.5-200.fc41.x86_64 (mockbuild@be03da54f8364b379359fe70f52a8f23) (gcc (GCC) 14.2.1 20250110 (Red Hat 14.2.1-7), GNU ld version 2.43.1-5.fc41) #1 SMP PREEMPT_DYNAMIC Thu Feb 27 15:07:31 UTC 2025
/ # cat /proc/cpuinfo
processor       : 0
vendor_id       : GenuineIntel
cpu family      : 6
model           : 142
model name      : Intel(R) Core(TM) i7-8565U CPU @ 1.80GHz
stepping        : 12
microcode       : 0xfc
cpu MHz         : 2900.231
cache size      : 8192 KB
...
/ # cat /proc/meminfo
MemTotal:       16210104 kB
MemFree:         3241444 kB
MemAvailable:    9901900 kB
Buffers:            5496 kB
Cached:          7888196 kB
...
Then, you will notice that the Alpine Linux container is using the Host OS kernel, Fedora Linux, with the kernel version 6.13.5-200.fc41.x86_64 that is shared from the Host OS. And also shared CPU and Memory from the Host machine.
Then, we wil test the currently running processes and IP addresses inside the container like this.
/ # ps aux
PID   USER     TIME  COMMAND
    1 root      0:05 /usr/lib/systemd/systemd --switched-root --system --deserialize=51 rhgb
    2 root      0:00 [kthreadd]
    3 root      0:00 [pool_workqueue_]
    4 root      0:00 [kworker/R-rcu_g]
    5 root      0:00 [kworker/R-sync_]
    6 root      0:00 [kworker/R-slub_]
    7 root      0:00 [kworker/R-netns]
    9 root      0:00 [kworker/0:0H-ev]
   12 root      0:00 [kworker/R-mm_pe]
   14 root      0:00 [rcu_tasks_kthre]
   15 root      0:00 [rcu_tasks_rude_]
   16 root      0:00 [rcu_tasks_trace]
   17 root      0:16 [ksoftirqd/0]
   18 root      0:10 [rcu_preempt]
   19 root      0:00 [rcu_exp_par_gp_]
   20 root      0:00 [rcu_exp_gp_kthr]
...
/ # ip addr show
1: lo: <LOOPBACK,UP,LOWER_UP> mtu 65536 qdisc noqueue state UNKNOWN qlen 1000
    link/loopback 00:00:00:00:00:00 brd 00:00:00:00:00:00
    inet 127.0.0.1/8 scope host lo
       valid_lft forever preferred_lft forever
    inet6 ::1/128 scope host noprefixroute
       valid_lft forever preferred_lft forever
2: wlo1: <BROADCAST,MULTICAST,UP,LOWER_UP> mtu 1500 qdisc noqueue state UP qlen 1000
    link/ether fa:8b:5b:09:59:51 brd ff:ff:ff:ff:ff:ff
    inet 192.168.55.127/24 brd 192.168.55.255 scope global dynamic noprefixroute wlo1
       valid_lft 75600sec preferred_lft 75600sec
    inet6 fe80::fa24:a316:4e60:c881/64 scope link noprefixroute
       valid_lft forever preferred_lft forever
...
In that time, you will notice that we will see all processes and network interfaces of the Host OS, Fedora Linux, from the chroot Alpine Linux container. It means that we have not isolated the process ID (PID) and network.
In the next section, we will learn how Linux namespaces work and how to use the unshare user-space client tool to interact with Linux namespaces to start a process in a namespace that isolates the process ID (PID), mount, IPC, network, and so on.
Linux Namespaces #
Namespaces are a feature of the Linux kernel that isolates and virtualizes system resources for a collection of processes. Namespaces have been released in the Linux kernel version 2.4.19 since 2002.
Namespaces are the foundation of modern Containerization technologies, such as Docker and Podman. Namespaces enable multiple processes to have different views of the system, such as different process IDs, network interfaces, filesystems, and so on.
Documentation: https://man7.org/linux/man-pages/man7/namespaces.7.html
Types of Linux Namespaces:
| Namespace | Manual Page | Isolates |
|---|---|---|
| PID (Process ID) | pid_namespaces | Isolates process IDs. |
| Mount | mount_namespaces | Isolates the set of mounted filesystems. |
| UTS (UNIX Timesharing System) | uts_namespaces | Isolates hostname and DNS name. |
| IPC (Inter-process Communication) | ipc_namespaces | Isolates IPC resources, such as message queue and shared memory. |
| Network | network_namespaces | Isolates network interfaces, IP addresses, routing tables, and port numbers. |
| User | user_namespaces | Isolates user and group IDs. |
| CGroup | cgroup_namespaces | Isolates the view of Control Groups (CGroups). |
How Linux Namespaces Work #
The Namespaces API supported the following system calls and Namespaces are created using these system calls.
clone()Creates a new process in a new namespace.unshare()Creates (or) moves the calling process to a new namespace.setns()Allows a process to join an existing namespace.
Example Use Cases
Consider a Container running on a Linux Host machine:
The container has its own Mount namespaces, So it can have its own root filesystem that is isolated from the Host OS.
The container has its own UTS namespaces, So it can have its own hostname that is isolated from the Host OS.
The container has its own PID namespaces, So processes inside the container have its own PIDs that are isolated from the Host OS.
The container has its own Network namespaces, So it can have its own IP addresses and network interfaces that are isolated from the Host OS.
Using the unshare User-space Tool #
The unshare command-line tool is a user-space tool to interact with Linux kernel namespaces by invoking the unshare(2) system call, to create a new process in a new namespace (or) move a process into an existing namespace that isolates the process IDs, mount points, IPC, network interfaces, and so on.
The unshare CLI client tool creates new namespaces for the calling process and it can create one or more of the following namespaces.
- PID (Process ID)
- Mount
- UTS (Hostname and domain name)
- IPC (Inter-process Communication)
- Network
- User
- Cgroup
Command Options:
--mount: Create a new mount namespace.--uts: Create a new UTS namespace (isolates hostname and domain name).--ipc: Create a new IPC namespace.--net: Create a new network namespace.--pid: Create a new PID namespace.--user: Create a new user namespace.--cgroup: Create a new cgroup namespace.--fork: Fork a new process to run the command (required for PID namespaces).
Go to the project directory,
$ cd containers/alpine-linux
Then, we will create a process, the Alpine Linux container, in PID (Process ID), Mount and Network namespaces using the unshare and chroot CLI tools.
$ sudo unshare --pid --mount --net -f chroot ./ /bin/sh
/ # ls -l
total 4
drwxr-xr-x    1 1000     1000           858 Feb 13 23:04 bin
drwxr-xr-x    1 1000     1000             0 Feb 13 23:04 dev
drwxr-xr-x    1 1000     1000           540 Feb 13 23:04 etc
drwxr-xr-x    1 1000     1000             0 Feb 13 23:04 home
drwxr-xr-x    1 1000     1000           146 Feb 13 23:04 lib
drwxr-xr-x    1 1000     1000            28 Feb 13 23:04 media
drwxr-xr-x    1 1000     1000             0 Feb 13 23:04 mnt
drwxr-xr-x    1 1000     1000             0 Feb 13 23:04 opt
dr-xr-xr-x    1 1000     1000             0 Feb 13 23:04 proc
drwx------    1 1000     1000            24 Mar 12 09:10 root
drwxr-xr-x    1 1000     1000             8 Feb 13 23:04 run
drwxr-xr-x    1 1000     1000           790 Feb 13 23:04 sbin
drwxr-xr-x    1 1000     1000             0 Feb 13 23:04 srv
drwxr-xr-x    1 1000     1000             0 Feb 13 23:04 sys
drwxr-xr-x    1 1000     1000             0 Feb 13 23:04 tmp
drwxr-xr-x    1 1000     1000            40 Feb 13 23:04 usr
drwxr-xr-x    1 1000     1000            86 Feb 13 23:04 var
Then, mount the /proc virtual filesystem to see the system and process information.
$ mount -t proc proc /proc
Then, check running processes and network interfaces on the Alpine Linux container.
/ # ps aux
PID   USER     TIME  COMMAND
    1 root      0:00 /bin/sh
    5 root      0:00 ps aux
/ # ip addr show
1: lo: <LOOPBACK> mtu 65536 qdisc noop state DOWN qlen 1000
    link/loopback 00:00:00:00:00:00 brd 00:00:00:00:00:00
Now, you will see the Alpine Linux container with an isolated environment (PID and Network). That’s fully isolated from the Host machine.
Single-Host Container Networking from Scratch #

TLDR;
#!/usr/bin/env sh

#
# CONTAINER (A): Alpine Linux Container
#
ip link add veth0 type veth peer name veth1
ip link set veth1 netns "${ALPINE_CONTAINER_PID}"
ip link set dev veth0 up
ip addr add dev veth1 172.19.35.2/24
ip link set lo up
ip link set veth1 up

#
# CONTAINER (B): Tiny Linux Container
#
ip link add veth2 type veth peer name veth3
ip link set veth3 netns "${TINY_CONTAINER_PID}"
ip link set dev veth2 up
ip addr add dev veth3 172.19.35.3/24
ip link set lo up
ip link set veth3 up

#
# Create a bridge network and bring it up.
#
ip link add br0 type bridge
ip link set veth0 master br0
ip link set veth2 master br0
ip addr add dev br0 172.19.35.1/24
ip link set br0 up
In this section, we will configure Container networking from scratch, and learn how its networking works and how Containers communicate at the networking layer.
Overview of Virtual Ethernet and Bridge Networking #
Virtual Ethernet (VETH) and Bridge Networking are key components of Linux virtual networking that enable communication between Containers and the Host Linux system. They are widely used in Containerization technologies, such as Docker and Kubernetes.
Virtual Ethernet (VETH) #
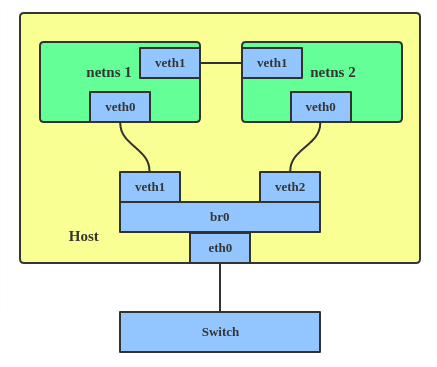
Virtual Ethernet (VETH) is a pair of virtual network interfaces that act like a pipe: whatever is sent in one end is received by the other. They are commonly used to connect Network namespaces to the Host machine or other Network namespaces.
A veth pair consists of two interfaces: one in the host machine’s Network namespace and one in the container’s Network namespace.
Packets sent through one interface are received by the other.
This allows communication between the container and the host or other containers.
Bridge Networking #
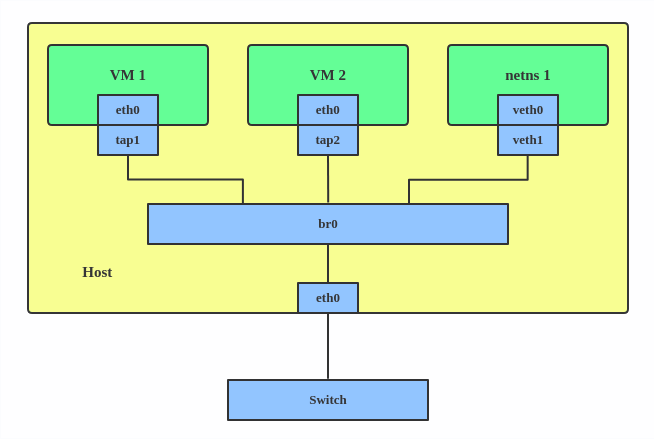
Bridge Network is a virtual network switch that connects multiple Network interfaces together. It allows Containers to communicate with each other.
A bridge acts as a Layer 2 device, forwarding Ethernet frames between connected interfaces.
Containers or virtual machines are connected to the bridge via VETH pairs.
The bridge can be connected to the host’s physical network interface to provide external connectivity.
Container A (Alpine Linux): Setting up VETH Network #
In this section, we will setup the VETH network on the Alpine Linux container.
Same as previous, we will create a process, the Alpine Linux container, in isolated PID (Process ID), Mount, and Network namespaces using the command-line tools, unshare, chroot.
$ cd ${HOME}/containers/alpine-linux
$ sudo unshare --pid --mount --net \
  -f chroot . \
  env -i \
    HOME=/root \
    HOSTNAME=alpine-linux \
  /bin/sh
$ mount -t proc proc /proc
Then, get the container’s PID from your Host Linux machine. The Alpine Linux container’s PID is 25473.
zawzaw@fedora-linux:~]$ ps -C sh
    PID TTY          TIME CMD
  25473 pts/6    00:00:00 sh
Then, set the ALPINE_CONTAINER_PID environment variable with the export command. This PID is required to set when creating the VETH network.
$ export ALPINE_CONTAINER_PID=25473
On the Host Linux machine, setup a veth network pair, veth0, veth1 with the ip command-line tool.
[zawzaw@fedora-linux:~]$ sudo ip link add veth0 type veth peer name veth1
[zawzaw@fedora-linux:~]$ sudo ip link set veth1 netns "${ALPINE_CONTAINER_PID}"
[zawzaw@fedora-linux:~]$ sudo ip link set dev veth0 up
On the Alpine Linux container and set an IP address 172.19.35.3 to the veth1 network device and bring up.
/ # ip addr add dev veth1 172.19.35.3/24
/ # ip link set lo up
/ # ip link set veth1 up
On the Host Linux machine, check the Network interfaces and IP addresses:
[zawzaw@fedora-linux:~]$ ip addr show veth0
11: veth0@if10: <BROADCAST,MULTICAST,UP,LOWER_UP> mtu 1500 qdisc noqueue state UP group default qlen 1000
    link/ether c6:23:c1:27:62:a8 brd ff:ff:ff:ff:ff:ff link-netnsid 1
    inet6 fe80::c423:c1ff:fe27:62a8/64 scope link proto kernel_ll
       valid_lft forever preferred_lft forever
On the Alpine Linux container, check the Network interfaces and IP addresses.
/ # ip addr show
1: lo: <LOOPBACK,UP,LOWER_UP> mtu 65536 qdisc noqueue state UNKNOWN qlen 1000
    link/loopback 00:00:00:00:00:00 brd 00:00:00:00:00:00
    inet 127.0.0.1/8 scope host lo
       valid_lft forever preferred_lft forever
    inet6 ::1/128 scope host
       valid_lft forever preferred_lft forever
10: veth1@if11: <BROADCAST,MULTICAST,UP,LOWER_UP,M-DOWN> mtu 1500 qdisc noqueue state UP qlen 1000
    link/ether 1e:c9:8c:80:fd:9a brd ff:ff:ff:ff:ff:ff
    inet 172.19.35.3/24 scope global veth1
       valid_lft forever preferred_lft forever
    inet6 fe80::1cc9:8cff:fe80:fd9a/64 scope link
       valid_lft forever preferred_lft forever
Now, you will see the VETH interfaces, veth0, veth1 are up and set its IP address to 172.19.35.3.
Container B (Tiny Linux): Setting up VETH Network #
For Container (B), we will use the Tiny Linux root filesystem image that I’ve compiled from the Linux kernel source code with busybox. Read more on Building a minimal Linux system from Scratch and Booting in QEMU Emulator.
[zawzaw@fedora-linux:~/containers/tiny-linux]$ tree
.
├── bin
├── dev
├── linuxrc -> bin/busybox
├── proc
├── sbin
├── sys
└── usr
Download: Tiny Linux Root Filesystem
In this section, we will setup the VETH network on the Tiny Linux container. Same as previous, we will create a process, Container (B) also known as the Tiny Linux container, in isolated PID (Process ID), Mount, and Network namespaces using the command-line tools, unshare, chroot.
$ cd ${HOME}/cd containers/tiny-linux
$ sudo unshare --pid --mount --net \
  -f chroot . \
  env -i \
    HOME=/root \
    HOSTNAME=tiny-linux \
  /bin/sh
$ mount -t proc proc /proc
Then, get the container’s PID from your Host Linux machine. The Tiny Linux container’s PID is 29999.
[zawzaw@fedora-linux:~]$ ps -C sh
    PID TTY          TIME CMD
  25473 pts/6    00:00:00 sh
  29999 pts/9    00:00:00 sh
Then, set the TINY_CONTAINER_PID environment variable with the export command. This PID is required to set when creating the VETH network.
$ export TINY_CONTAINER_PID=29999
On the Host Linux machine, setup a veth network pair, veth2, veth3 with the ip command-line tool.
[zawzaw@fedora-linux:~]$ sudo ip link add veth2 type veth peer name veth3
[zawzaw@fedora-linux:~]$ sudo ip link set veth3 netns "${TINY_CONTAINER_PID}"
[zawzaw@fedora-linux:~]$ sudo ip link set dev veth2 up
On the Container (B), Tiny Linux container and set an IP address 172.19.35.2 to the veth3 network device and bring up.
/ # ip addr add dev veth3 172.19.35.2/24
/ # ip link set lo up
/ # ip link set veth3 up
On the Host Linux machine, check the Network interfaces and IP addresses.
13: veth2@if12: <BROADCAST,MULTICAST,UP,LOWER_UP> mtu 1500 qdisc noqueue state UP group default qlen 1000
    link/ether 06:97:e6:1f:d4:b3 brd ff:ff:ff:ff:ff:ff link-netnsid 2
    inet6 fe80::497:e6ff:fe1f:d4b3/64 scope link proto kernel_ll
       valid_lft forever preferred_lft forever
On the Container (B), Tiny Linux container, check the Network interfaces and IP addresses.
1: lo: <LOOPBACK,UP,LOWER_UP> mtu 65536 qdisc noqueue qlen 1000
    link/loopback 00:00:00:00:00:00 brd 00:00:00:00:00:00
    inet 127.0.0.1/8 scope host lo
       valid_lft forever preferred_lft forever
    inet6 ::1/128 scope host
       valid_lft forever preferred_lft forever
12: veth3@if13: <BROADCAST,MULTICAST,UP,LOWER_UP,M-DOWN> mtu 1500 qdisc noqueue qlen 1000
    link/ether 72:37:8b:a8:26:7e brd ff:ff:ff:ff:ff:ff
    inet 172.19.35.2/24 scope global veth3
       valid_lft forever preferred_lft forever
    inet6 fe80::7037:8bff:fea8:267e/64 scope link
       valid_lft forever preferred_lft forever
Now, you will see the VETH network interfaces, veth2, veth3 are up and set its IP address to 172.19.35.2.
But now, you will notice that Containers can’t communicate with each other. To confirm this, you can test by running the ping command.
- (A) Alpine Linux Container’s IP address:
172.19.35.3 - (B) Tiny Linux Container’s IP address:
172.19.35.2
For example, ping 172.19.35.3 from the Tiny Linux container. It will not work and is not reachable network from one to another one because we need to setup a Bridge network.
/ # ping -c 5 172.19.35.3
PING 172.19.35.3 (172.19.35.3): 56 data bytes

--- 172.19.35.3 ping statistics ---
5 packets transmitted, 0 packets received, 100% packet loss
In the next section, you’ll learn how to setup a Bridge network to forward the network packets between two containers.
Setting Up Bridge Network #
We now have two containers, Alpine Linux and Tiny Linux, running in fully isolated PID, Mount and Network Linux namesapces. They also have the Virtual Enthernet (VETH) pair in the same Network Linux namespace.
In this section, we will continue to setup a Bridge network to forward the network packets to the Two Containers.

On the Host Linux machine,
setup a Bridge network and attach it to the veth0 and veth2 network interfaces.
[zawzaw@fedora-linux:~]$ sudo ip link set veth0 master br0
[zawzaw@fedora-linux:~]$ sudo ip link set veth2 master br0
[zawzaw@fedora-linux:~]$ sudo ip addr add dev br0 172.19.35.1/24
Then, set an IP address 172.19.35.1 to the br0 network interface.
[zawzaw@fedora-linux:~]$ sudo ip link set br0 up
[zawzaw@fedora-linux:~]$ ip addr show br0
14: br0: <BROADCAST,MULTICAST,UP,LOWER_UP> mtu 1500 qdisc noqueue state UP group default qlen 1000
    link/ether 06:97:e6:1f:d4:b3 brd ff:ff:ff:ff:ff:ff
    inet 172.19.35.1/24 scope global br0
       valid_lft forever preferred_lft forever
    inet6 fe80::497:e6ff:fe1f:d4b3/64 scope link proto kernel_ll
       valid_lft forever preferred_lft forever
Then, you can test network reachability between Two Containers by running the ping command-line tool.
For example, ping 172.19.35.3 from the Tiny Linux container.
/ # ping -c 5 172.19.35.3
PING 172.19.35.3 (172.19.35.3): 56 data bytes
64 bytes from 172.19.35.3: seq=0 ttl=64 time=0.070 ms
64 bytes from 172.19.35.3: seq=1 ttl=64 time=0.041 ms
64 bytes from 172.19.35.3: seq=2 ttl=64 time=0.059 ms
64 bytes from 172.19.35.3: seq=3 ttl=64 time=0.072 ms
64 bytes from 172.19.35.3: seq=4 ttl=64 time=0.050 ms

--- 172.19.35.3 ping statistics ---
5 packets transmitted, 5 packets received, 0% packet loss
For example, ping 172.19.35.2 from the Alpine Linux container.
/ # ping -c 5 172.19.35.2
PING 172.19.35.2 (172.19.35.2): 56 data bytes
64 bytes from 172.19.35.2: seq=0 ttl=64 time=0.051 ms
64 bytes from 172.19.35.2: seq=1 ttl=64 time=0.105 ms
64 bytes from 172.19.35.2: seq=2 ttl=64 time=0.042 ms
64 bytes from 172.19.35.2: seq=3 ttl=64 time=0.053 ms
64 bytes from 172.19.35.2: seq=4 ttl=64 time=0.052 ms

--- 172.19.35.2 ping statistics ---
5 packets transmitted, 5 packets received, 0% packet loss
Now, we can confirm that Two Containers can communicate with each others and work properly.
Reference Links:
- https://blog.mbrt.dev/posts/container-network
- https://labs.iximiuz.com/tutorials/container-networking-from-scratch
- https://developers.redhat.com/blog/2018/10/22/introduction-to-linux-interfaces-for-virtual-networking